
티스토리 뷰
Element 객체란?
Element 객체는 엘리먼트를 추상화한 객체이다.
 <ul>
      <li>html</li>
      <li>css</li>
      <li id="active" class="important current">JavaScript</li>
    </ul>
    <script>
        //li엘리먼트에 대한 객체를 t라는 변수에 담기
        //li객체를 통해서 li엘리먼트를 제어할 수 있게 됨
        //여기서 t라는 변수에 담긴 객체는 정확히는 HTMLLIElement입니다.
        const t = document.getElementById("active");


    </script>
| Element |
| HTMLElement |
| HTMLLIElement |
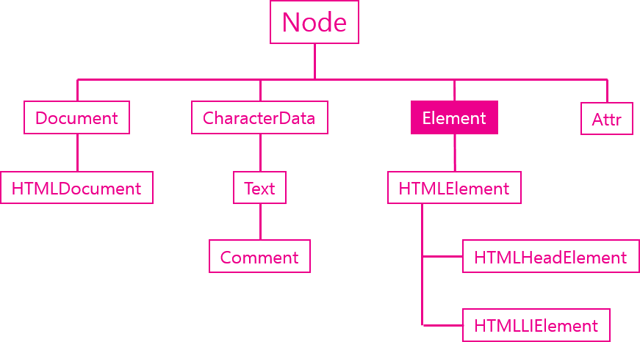
표의 상단이 상위개념 아래로 갈수록 하위개념 "부모 - 자식" 관계입니다. 위의 프로퍼티를 아래로 상속하는 상속 관계이기도 합니다.
- HTMLElement(모든 엘리먼트들의 기본적인 특징을 정의하고 있음)의 대표 특징으론 .style을 통해서 css를 제어할 수 있다는 것
- Element - HTMLElement와 비슷한 개념이다. 구분을 하는 이유는 DOM이 HTML만을 제어하기 위한 모델이 아니기 때문이다. DOM은 HTML이나 XML, SVG, XUL과 같이 마크업 형태의 언어를 제어하기 위한 규격이기 때문에 Element는 마크업 언어의 일반적인 규격에 대한 속성을 정의하고 있고, 각각의 구체적인 언어(HTML,XML,SVG)를 위한 기능은 HTMLElement, SVGElement, XULElement와 같은 객체를 통해서 추가해서 사용하고 있다.
- 즉, DOM은 위에서 언급된 마크업 언어들의 표준이기 때문에 DOM을 다룰 수 있게 되면 다른 마크업 언어들을 익히는데 편리하다.
다른 객체들과의 관계
DOM의 계층구조에서 Element객체의 위치는 아래와 같습니다.
Element 객체의 식별자 API
-Element 객체의 프로퍼티에 대해서 알아봅시다.
엘리먼트를 제어하기 위해서는 그 엘리먼트를 조회하기 위한 식별자가 필요하다.
HTML에서 엘리먼트의 이름과 id 그리고 class는 식별자로 사용된다. 식별자 API는 이 식별자를 가져오고 변경하는 역할을 한다.
▶Element.tageName ( 읽기 전용, 변경 불가 )
해당 엘리먼트의 태그 이름을 알아낸다. 태그 이름을 변경 X
<body>
    <ul>
      <li>html</li>
      <li>css</li>
      <li id="active" class="important current">JavaScript</li>
    </ul>
    <script>
      const t = document.getElementById("active").tagName;
      console.log(t); //output: LI , li태그를 의미
</script>▶Element.id (읽고 수정 가능)
*문서에서 id는 단 하나만 등장할 수 있는 식별자
id의 값(id명)을 읽고 변경할 수 있다.
<body>
    <ul>
      <li>html</li>
      <li>css</li>
      <li id="active" class="important current">JavaScript</li>
    </ul>
    <script>
      let active = document.getElementById("active");
      console.log(active.id); // output: active
      active.id = "deactive";
      console.log(active.id); // output: deactive
    </script>
  </body>
▶Element.className (읽고 수정 가능) // 그닥 추천되지 않음
*HTML 속성이름(class)과 Element객체의 프로퍼티명(className)이 일치하지 않는 경우가 있는데 대부분의 경우가 JS의 예약어일 경우일 때입니다. 언제나 이름이 같지 않다는 것을 염두해두자.
클래스의 이름을 읽고 변경할 수 있다. 여러 개의 엘리먼트를 그룹핑할 때 사용한다.
- 하지만 추가할 때 전체를 다 수정해주거나 변경되지 않아야 하는 것들을 고려해서 추가 혹은 삭제를 해야하기 때문에 사용하기에 번거로움 ->이에 대한 대체재로 Element.classList를 사용
<script>
    //식별자 API .className 사용하기
      let active = document.getElementById("active");
      console.log(active.className); // output:important current
      //기존에 있던 거에 새로운 클래스 추가하기
      active.className = active.className + " noob"; //개별 클래스명 구분을 위해 앞에 공백있어야 함
      //short ver) active.className += " noob";
      console.log(active.className); // output:important current noob
</script>▶Element.classList (읽고 수정 가능)
className에 비해서 편리한 사용성을 제공한다.
여러 개의 클래스명을 담은 객체를 반환 -> DOMTokenList 객체, 유사배열로 배열처럼 사용가능
- classList.add("클래스명")
- classList.remove("클래스명")
- classList.toggle("클래스명")
<body>
    <ul>
      <li>html</li>
      <li>css</li>
      <li id="active" class="important current">JavaScript</li>
    </ul>
    <script>
      const active = document.getElementById("active");
      console.log(active.classList);
      console.log(active.classList.length); //output: 2
      //반복문을 순회하여 클래스 리스트 열거하기
      for (let i = 0; i < active.classList.length; i++) {
        console.log(active.classList[i]);
      } //output: important, current
      //클래스 추가하기
      active.classList.add("added");
      console.log(active.classList);
      //클래스 삭제하기
      active.classList.remove("added");
      console.log(active.classList);
     //실행할 때마다 추가했다가 제거했다가 하고 싶을 때 -> toggle(on off스위치 같은 것)
      //toggle : 있다면 제거, 없다면 추가하는 기능
      active.classList.toggle("gamza");
      console.log(active.classList); //gamza 추가됨
      active.classList.toggle("gamza");
      console.log(active.classList); //gamza 삭제됨
    </script>
  </body>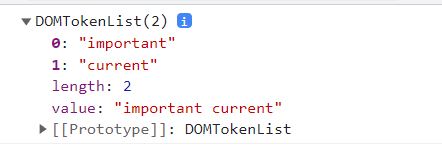
Element 객체의 조회 API
엘리먼트를 조회하는 기능
조회 대상을 제한하는 방법(조회 범위를 좁히는 것)에 대해 중점적으로 다뤄본다.
지금까지 document.getElementsBy* 메소드를 통해서 엘리먼트를 조회했다. document객체는 문서 전체를 의미하는 엘리먼트이기 때문에 document의 조회 메소드는 문서 전체를 대상으로 엘리먼트를 조회한다.
Element 객체 역시 getElementsBy* 엘리먼트를 가지고 있는데 Element 객체의 조회 메소드는 해당 엘리먼트의 하위 엘리먼트를 대상으로 조회를 수행한다.
-> 더 좁은 범위에서 엘리먼트를 조회하고자 한다면(e.g.id명이 active인 li태그의 하위 엘리먼트만 조회하고 싶다.) element 객체의 getElementBy* 를 쓰는 것이 좋다.
- Docuemnt.getElementBy * 문서 내의 모든 엘리먼트에서 조회
- Element.getElementBy * 범위를 정해두고 해당 범위 안에서 원하는 엘리먼트 조회
 //id가 active인 엘리먼트의 하위 요소들(marked)만 조회
      console.group("active");
      const active = document.getElementById("active");
      //active내에서 조회하고 있다. 여기서 element 객체의 getElementsByClassName 메소드 사용
      const list2 = active.getElementsByClassName("marked");
      for (let i = 0; i < list2.length; i++) {
        console.log(list2[i].textContent);
      }
      console.groupEnd();
Element 객체의 속성 API
속성은 HTML에서 태그명만으로는 부족한 부가적인 정보라고 할 수 있다.
속성을 어떻게 제어하는 지 알아보자
속성을 제어하는 API는 아래 예제와 같다. 각각의 기능은 이름을 통해서 유추 가능하다.
- .getAttribute("속성명"); - get 말 그대로 속성값을 가져온다.
- .setAttribute("속성", "속성값"); - 2개의 인자를 가지며 속성값을 설정(set)한다.
- .hasAttribute("속성명") - 존재 여부 확인 true/false 반환
- .removeAttribute("속성명") - 속성을 제거한다.
body>
    <!-- a태그에서 속성(property)은 녹색으로 표시된 id, href 이다.  -->
    <a id="target" href="http://opentutorials.org">opentutorials</a>
    <script>
    //id명이 target인 엘리먼트 객체를 변수 t에 담기
      const t = document.getElementById("target");

      console.log(t.getAttribute("href")); //http://opentutorials.org
      t.setAttribute("title", "opentutorials.org"); // title 속성의 값을 설정한다.
      console.log(t.hasAttribute("title")); // true, title 속성의 존재여부를 확인한다.
      t.removeAttribute("title"); // title 속성을 제거한다.
      console.log(t.hasAttribute("title")); // false, title 속성의 존재여부를 확인한다.
    </script>
  </body>
속성 API 관련: 속성과 프로퍼티(attribute vs property)
모든 엘리먼트의 (HTML)속성은 (JavaScript 객체의) 속성과 프로퍼티로 제어가 가능하다.
*attribute 를 속성이라하고 property를 프로퍼티라고 구분하겠음
const target = document.getElementById("target");

//attribute 방식

target.setAttribute("class", "important");

//property방식

taget.className = "important";
위의 예시 코드의 attribute방식과 property방식은 같은 결과를 만든다.
※property 방식 장점 & 단점(attribute 방식과 비교 시)
- 장점은 좀 더 간편한 코드로 작성이 가능하고 속도도 빠르다.
- 단점은 html속성의 이름과 다른 이름을 갖는 경우가 있다. 그 이유는 자바스크립트의 이름 규칙 때문이다.
| class | className |
| readonly | readOnly |
| rowspan | rowSpan |
| colspan | colSpan |
| usemap | userMap |
| frameborder | frameBorder |
| for | htmlFor |
| maxlength | maxLength |
※심지어는 속성과 프로퍼티는 값(문맥상 결과물, 가져오는 값)이 다를 수도 있다. 아래의 코드를 보면 이해를 하기 쉬울 것이다.
->속성과 프로퍼티의 값이 꼭 같은 것은 아니라는 것을 보여준다.
//현재 웹페이지가 http://localhost/webjs/Element/attribute_api/demo3.html 일 때
      var target = document.getElementById("target");

      console.log("target.href", target.href);
      //output:  // http://localhost/webjs/Element/attribute_api/demo1.html
      console.log('target.getAttribute("href")', target.getAttribute("href"));
//output : // ./demo1.html- 보면 target.getAttribute("href")일 때, 속성값이 더 짧게 나온 것을 알 수 있다.
'Frontend > JavaScript' 카테고리의 다른 글
| [생활코딩][웹브라우저JS]- 문자열로 노드 제어 (0) | 2022.02.09 |
|---|---|
| [생활코딩][웹브라우저JS]- Node 객체, Node객체 API (0) | 2022.02.06 |
| [생활코딩]-JS Execute context & closure (0) | 2022.02.02 |
| [생활코딩][웹브라우저JS]- HTMLElement, Dom Tree (0) | 2022.01.29 |
| [생활코딩][웹브라우저JS]- 창 제어(window객체) (0) | 2022.01.27 |
- Total
- Today
- Yesterday
- && 셸 명령어
- 항해99추천비추천
- grid flex
- getServerSideProps
- 원티드 프리온보딩 프론트엔드 챌린지 3일차
- fs모듈 넥스트
- reactAPI
- float 레이아웃
- text input pattern
- tilde caret
- 부트캠프항해
- 원티드 3월 프론트엔드 챌린지
- is()
- 프리렌더링확인법
- 프리온보딩 프론트엔드 챌린지 3월
- nvm 설치순서
- 항해99프론트
- aspect-ratio
- 타입스크립트 장점
- 틸드와 캐럿
- getStaticPaths
- 원티드 FE 프리온보딩 챌린지
- Prittier
- 원티드 프리온보딩 FE 챌린지
- ~ ^
- 형제 요소 선택자
- D 플래그
- 타입스크립트 DT
- 항해99프론트후기
- nvm경로 오류
| 일 | 월 | 화 | 수 | 목 | 금 | 토 |
|---|---|---|---|---|---|---|
| 1 | ||||||
| 2 | 3 | 4 | 5 | 6 | 7 | 8 |
| 9 | 10 | 11 | 12 | 13 | 14 | 15 |
| 16 | 17 | 18 | 19 | 20 | 21 | 22 |
| 23 | 24 | 25 | 26 | 27 | 28 |